USB debugging serves as a vital tool for both Android developers and enthusiasts. It facilitates the exchange of commands and data between your Android device and a computer via a USB connection. With USB debugging activated, you gain the ability to perform tasks such as capturing bug reports, installing apps from sources other than the Play Store, rooting your device, and more.
Nevertheless, USB debugging is initially deactivated on Android devices for security purposes. Enabling it necessitates navigating to the hidden developer options menu. In this guide, we’ll provide a comprehensive walkthrough of the steps to enable USB debugging on your Android smartphone.
What is USB Debugging?
With the Android Debug Bridge (ADB), you can use a computer to connect to an Android device and talk to it through a USB cable.
If you enable ADB and USB debugging, you can use commands to control your device, send and receive files, install apps, and get system details like log files that can help you figure out what’s wrong. ADB is used a lot by developers to try and fix bugs in apps while they are being made.
But USB hacking is useful for more than just making apps. ADB is often used by power users and Android tinkerers to root devices, run custom ROMs, back up data, and get a better handle on their Android experience in general.
Of course, letting a computer have that much access to your device does make it less safe. That’s why USB debugging is off by default, and you must tell each computer you connect to that you want to use USB debugging.
How to Enable Developer Options on Android
The first step to enabling USB debugging is to unlock the Developer options menu in Android’s settings.
Android 4.2 and Newer:
Step 1: Unlock Developer options
- Open the Settings app and scroll down to the bottom. Tap About phone.
- Tap on Baseband & kernel and Build number entry. Tap it seven times in quick succession. You’ll get a notification that You are now a developer!.
Step 2: Enable Developer options
Once you have unlocked the developer options you can follow these steps to enable it:
- Go back to the main Settings menu. Next, tap on Additional settings.
- Tap on Developer options.
- Turn on Developer options if not enabled.
Android 4.1 and Older:
- Open Settings and tap Developer options. It should be listed right in the main menu.
If you don’t see Developer options right away, then tap the Build number seven times as described above.
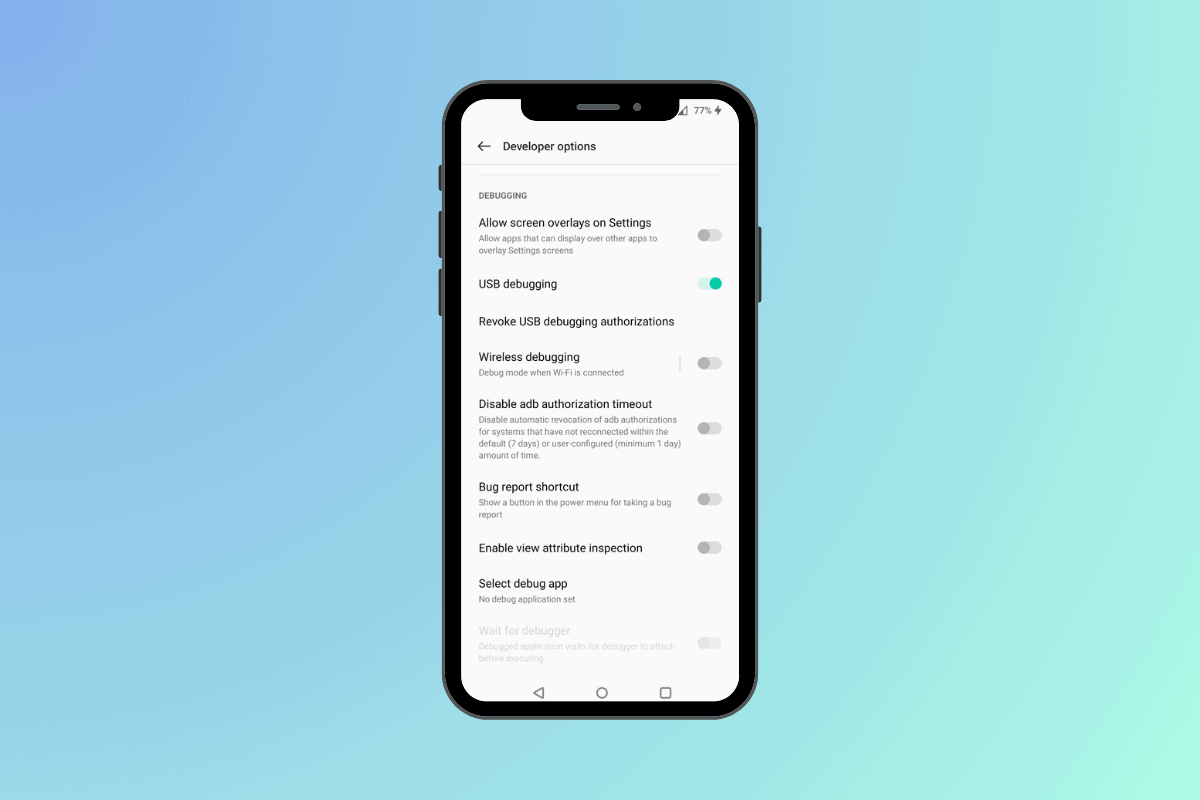
How to Enable USB Debugging on Android
With the Developer options menu now visible, you can enable USB debugging. Here’s how:
- Open the Developer options menu.
- Scroll down and find the USB debugging option. Tap the slider to enable it.
- You may get a prompt explaining that USB debugging is meant for development purposes and can allow a computer to access private data on your device. Read the details and tap OK if you understand the risks.
How to Authorize USB Debugging Access
You’ll be asked to give the computer permission to use USB debugging the first time you connect your Android device to a new computer that has it turned on. There will be no way for the computer to talk to your device through ADB until you do this.
It should ask you Allow USB debugging? when you plug in your Android device, and you can choose OK or Cancel. Check the box next to Always allow from this computer to always let USB debugging work without being asked again.
If you don’t see this message, try unplugging your device and then putting it back in while the screen is on and not locked. You can also restart the list of computers that are allowed to use USB debugging by going to Developer options and then Revoke USB debugging authorizations.
Once you’ve given your computer permission to use USB debugging, you’re good to go! You can now connect to your phone via USB and use ADB and other tools that need it.
Once you enable USB debugging on your Android device, you’ll be able to do a lot of cool things with it.