Screenshots on a Macbook are images captured from your computer screen while performing a task. You can take screenshots of your entire screen, a specific window, menu, or even a selected portion of the screen. These screenshots are helpful for capturing information, sharing visuals in communication, or creating documentation.
ADVERTISEMENTS
There are two main ways to take screenshots on a Mac:
Using Keyboard Shortcuts
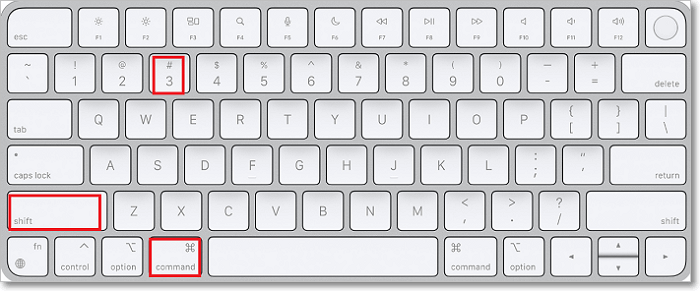
- Capture Entire Screen: Press
Command (⌘) + Shift + 3. The screenshot will be saved on your desktop by default - Capture a Selected Portion of the Screen: Press
Command (⌘) + Shift + 4, then click and drag to select the portion of the screen you want to capture. Release the mouse button to take the screenshot. Again, it will be saved on your desktop. - Capture a Specific Window: Press
Command (⌘) + Shift + 4, then press theSpacebar. Your cursor will turn into a camera icon. Click on the window you want to capture. The screenshot of the window will be saved on your desktop.
Using Grab App
If you prefer more control and options, you can use the Grab app, which comes pre-installed on your MacBook. To use Grab, follow these steps:
- Open “Finder”.
- Go to “Applications”.
- Open the “Utilities” folder.
- Launch the “Grab” app.
- In the Grab menu, you can choose to capture the entire screen, a window, a selection, or a timed screen. Select the option you need.
- After capturing, you can save the screenshot.
The screenshots are usually saved as PNG files on your desktop by default. You can also customize the save location and file format using the Screenshot tool or Keyboard settings.